Car floor mats serve several important functions: they protect the vehicle’s flooring from dirt, moisture, and wear; help maintain a clean and tidy interior; and enhance driving safety by preventing slippage underfoot.
When choosing floor mats, it’s important to consider factors such as material, vehicle compatibility, coverage area, price, and installation method. Installation, in particular, plays a crucial role more than many people realize. Improperly installed mats can shift while driving, potentially sliding under the pedals and creating serious safety hazards.
Let’s walk through the proper steps for installing floor mats in car to ensure both safety and functionality.
Step-by-Step Guide to Installing Car Floor Mats in Car

Step 1. Unboxing and Inspection
When your new floor mats arrive, the first step is to unbox and inspect them carefully.
- Check for damage or mismatched sizes right away. Any tears, warping, or incorrect sizing should be addressed immediately.
- If you find any issues, contact the seller for a return or replacement before attempting installation.
Step 2. Remove Old Floor Mats
Before installing your new mats, you’ll need to remove the old ones completely.
- Pull out all the old mats from the vehicle.
- Make sure to shake off any debris that might have accumulated underneath, and dispose of or store the old mats if they’re still usable.
Step 3. Clean the Floor Area
Cleaning your car's carpet before installation the floor mats helps prevent the buildup of sand and debris, reduces interior dust and odors, and minimizes wear between the floor mats and the original flooring—effectively protecting your vehicle’s interior.
- Use a vacuum cleaner or a damp cloth to remove dust, sand, and any debris from the floor. If you're unsure how to effectively clean your car's interior, this blog post—How to Clean Your Car Interior Like a Pro— is sure to help.
- Make sure the area is dry and flat, especially if your mats use adhesive or Velcro for installation.
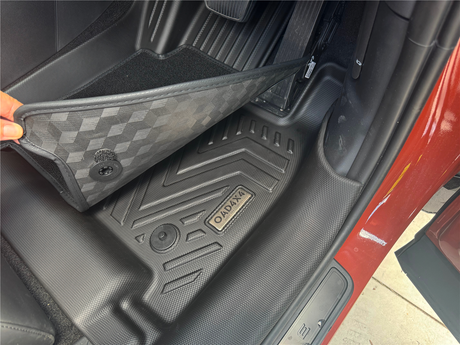
Step 4. Place New Floor Mats and Check Fit
Now you’re ready to position the new mats inside your vehicle.
- Lay each mat down in its designated area—driver’s side, passenger side, and rear rows floor.
- Confirm that each mat covers the carpet completely and the edges align with the contours of your car’s interior. A snug fit is essential for maximum protection and appearance.
Step 5. Secure the Mats in Place
Depending on the design, your mats will use either Velcro strips or built-in clips.
- Velcro installation: Peel off the backing and press the mat down firmly to make sure the adhesive sticks well to the carpet.
- Clip installation: Align the mat with the factory retention clips. Press down until you hear a “click”, ensuring the mat is securely fastened.
- Double-check the position of the driver’s side mat to ensure it doesn’t interfere with the gas, brake, or clutch pedals.
Note: If your vehicle doesn’t come with factory retention clips, we recommend opting for custom-fit mats with broader coverage. These mats tend to stay more securely in place, reducing the risk of slipping and enhancing driving safety.
Cleaning and Maintenance Tips
Daily Cleaning Methods
Proper maintenance not only keeps your car looking neat but also extends the life of your mats. Here’s how to clean different materials:
- Rubber or TPE mats: Simply hose them down with water and use a soft brush to scrub away mud or grime. Let them air dry before reinstalling.
- Coil (silk loop) mats: Shake them to remove loose dirt. For a deeper clean, use a pressure washer to blast away embedded debris.
- Leather mats: Wipe with a damp cloth, and avoid direct sunlight while drying to prevent cracking or fading.
Usage Precautions
- Check the security of your mats regularly, especially those on the driver’s side. A loose mat could slip and interfere with pedal operation.
- Avoid letting liquids pool on the mats, especially on leather versions, as this can cause stains and odors.
- Always ensure the anti-slip features are working—whether it’s textured backing, clips, or Velcro pads.
Why OAD4x4 Floor Mats Are the Ideal Choice

When it comes to quality and peace of mind, OAD4x4 Accessories floor mats stand out for several key reasons:
- Vehicle-Specific Fit & High-Coverage: Every OAD4x4 mat is precision-cut for specific models, providing a wide coverage and tight corner fitment with no shifting or curling.
- Safe and Reliable Fastening: Combining factory-style clips with anti-slip backing, OAD4x4 mats stay locked in place no matter how much you drive.
- Easy-to-Clean Materials: Made from waterproof and dirt-resistant surfaces, these mats save you time and effort in maintenance.
- Durability That Lasts: Constructed from TPE (Thermoplastic Elastomers) materials, they resist wear and deformation, even under frequent use or in harsh climates.
Whether you're commuting in the city or venturing off-road, OAD4x4 floor mats are built to withstand the elements and keep your interior looking fresh.
Conclusion

Installing floor mats might seem like a simple task, but doing it correctly is crucial for safety and vehicle upkeep. By following the right steps—removing old mats, cleaning thoroughly, aligning the new ones properly, and securing them—you can ensure a safer and more comfortable driving experience.
Choosing the right attachment method—whether Velcro-backed floor mats or clip-in car mats—as well as selecting the ideal material, such as rubber all-weather mats or durable carpeted floor liners, will make a noticeable difference in usability and longevity. Regular cleaning and maintenance can further extend the lifespan of your mats and keep your interior looking clean and professional.
If you're in the market for a reliable, well-designed floor mat, OAD4x4 offers one of the best options—combining style, safety, and convenience. Give your vehicle the protection it deserves with mats that are made to fit and made to last.